
Entrusting the execution of WordPress Cron to a web server or a third party service has always been a topic of different opinions since there is numerous methods how to do it and most of them are problematic. This article will cover the topics – why it is needed at all, what is the correct way of running a WordPress Cron jobs and moreover – what is the correct way for running them on PLESK (Linux) or directly from CloudFlare.
Why not to use the default WordPress Cron?
As you’ve probably heard, Cron is a service that does automated tasks in the background at specific time intervals while your website is being served to the site visitors. By default, WordPress uses its own “cron” solution – a simulated service that is tied to every page load.
While this simulated “cron” service seem to be sufficient, it has a couple disadvantages over a dedicated cron solution:
- To ensure that cron tasks are being run on time your website would need a constant stream of visitors – e.g. if you have an extensive task which you want to be run at the 3AM when nobody visits the site, there is no guarantee it will be run at that time; On top of that – for sites which are using page cache, even a frequent visits from site visitors would not help to trigger the default cron service on time.
- For low traffic sites – delayed cron schedule could cause a “buildup” of cron tasks which could cause a stress on the server resources and temporarily degrade the site performance;
- For low traffic sites – it is good to keep the site “warmed up”. Depending on how the server is configured, a WordPress website which haven’t been visited even for a while, could cause the various cache invalidation issues, resulting in a slow page loading time for the next upcoming request. While it would not seem important at first for the site visitors, this could degrade the SEO scores for your website – note that search engine crawlers like Google Bot take in account the average page load time.
If you want your website to work reliably, smoothly and you’re serious about the SEO and user experience – you should entrust these background tasks to a dedicated cron service such as the server cron or a scheduled service in the CloudFlare Workers section, which will periodically run automated tasks in the background.
Disable the WP-Cron
This is the easiest part to start with. To disable the default WordPress “cron” solution, you should add a DISABLE_WP_CRON constant to your WordPress configuration file (wp-config.php):
define('DISABLE_WP_CRON', true);After doing this, the default WordPress “cron” service should no longer work. Next – you need to properly configure a dedicated cron service – add a task in the server cron or use a third party solution.
How to run WordPress Cron tasks from the server cron
There is at least 4 methods how you can configure the WordPress Cron tasks to run from the server cron:
- You can directly execute a wp-cron.php file;
- You can run a cron command via WordPress CLI;
- You can run it by making a HTTP GET request to the wp-cron.php file via wget command;
- You can just use the “Take over wp-cron.php” option in WP Toolkit (integrated in PLESK).
The correct way is to run the WordPress Cron tasks by making a HTTP request to wp-cron.php file via wget command.
While this seems inefficient (all those dns lookups, ssl handshakes and validity checks, etc), it is the most correct way in terms of compatibility. The key is that many WordPress plugins are written by not taking in account that php files can be executed directly or something could be run via WP-CLI and those developers who use these seemingly “more correct” methods are just asking for trouble sooner or later which yields to disrupted WP Cron service or unexpected results generated by it.
Here is an example of wget command, which you can use safely to run WordPress Cron in any linux based hosting environment (chrooted or not), including PLESK:
wget -qO - https://mywebsite.tld/wp-cron.php?doing_wp_cron >/dev/null 2>&1 --secure-protocol tlsv1 --no-check-certificate --inet4-onlyBasically it is a “wget” command, which has been instructed to run quietly, not produce any output, ignore the SSL errors, lookup only IPv4 connections and make a request to WordPress cron file. All these flags are necessary to bypass numerous problems you could face.
As for the interval, I’d recommend to schedule the WordPress cron task for running at least once in 5 minutes.
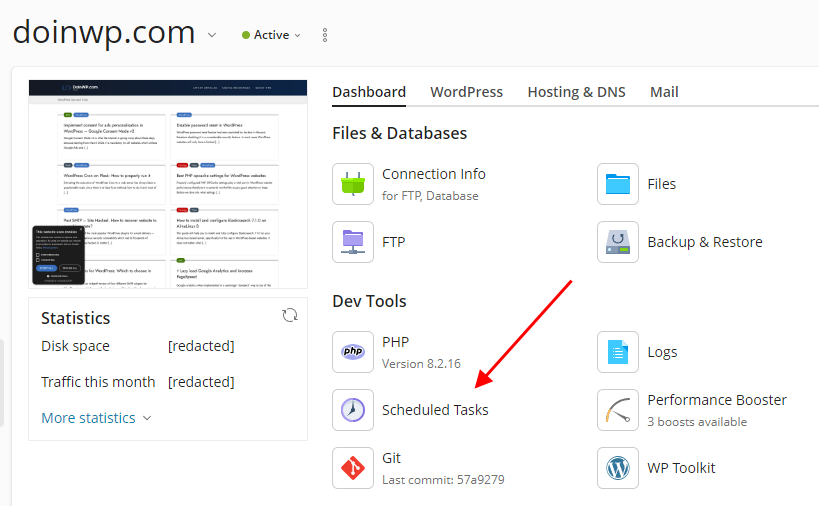
Add a server cron task for WordPress via Plesk
To run WordPress cron from a Plesk server, you must log into the Plesk interface, go to your domain profile and click on the “Scheduled Tasks” button in the Dev Tools section of your Dashboard.
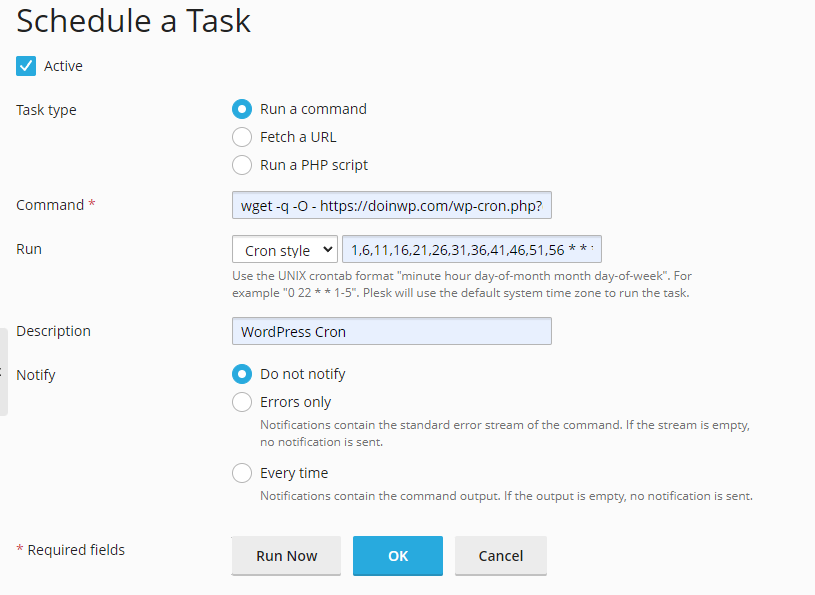
Then click on the “+ Add Task” button to add a new cron task, select the task type as “Run a command“, add your cron command to the “Command” field and set the run interval in the “Run” field by selecting the “Cron Style” option. If you’re not familiar with the cron syntax for intervals, here are a few samples to use:
#1 This will run the cron task on specific minutes (1,6,11…) each hour:
1,6,11,16,21,26,31,36,41,46,51,56 * * * *#2 This will run the cron task every 5 minutes
*/5 * * * *As for the description and notify fields – they’re optional. Here’s a complete picture of a configured cron task in Plesk:
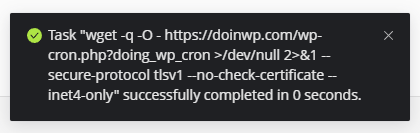
When you’ve configured everything, be sure to test the cron task by clicking on the “Run Now” button. You should get a notice in Plesk interface with a green checkmark – that means the cron task has been executed without problems.
Do not worry if it does not work out for you – check the Common problems with running cron section further in this article.
How to run WordPress Cron from CloudFlare
Running WordPress Cron from CloudFlare is an alternate method which you can use if you do not have an option to schedule the cron tasks from your web hosting or you just want to take a little extra work-load away from your server.
It can be done by utilizing the CloudFlare Workers feature which is also included in CloudFlare free plan. The concept of how it works is pretty similar to the previous one – CloudFlare service will regularly make a get request to the wp-cron.php file of your WordPress installation. There are some daily usage limits though – you can do only 100 000 requests per day, but that should be more than enough to handle cron for couple of websites.
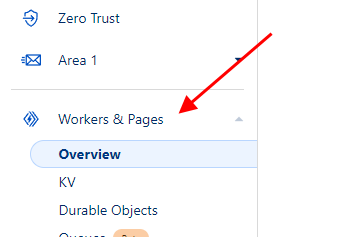
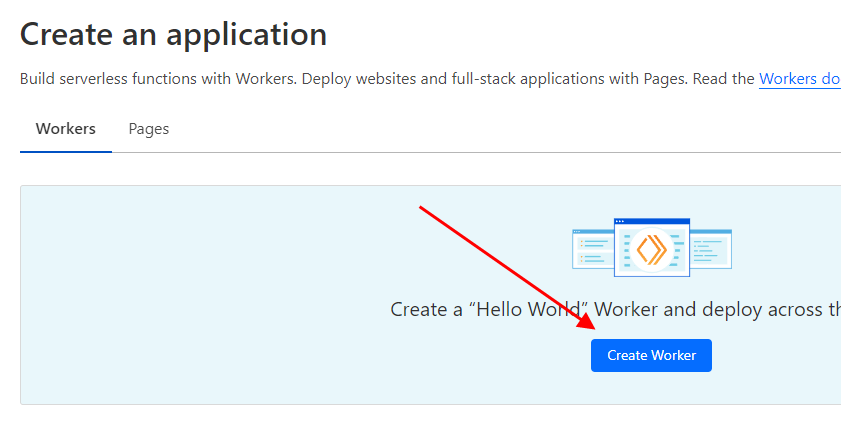
#1 Log into the CloudFlare, select your account (if not loaded automatically) and go straight to the “Workers & Pages” section (without selecting a domain profile)
#2 Click on “Create application” button, then on the next screen – click on “Create Worker” button
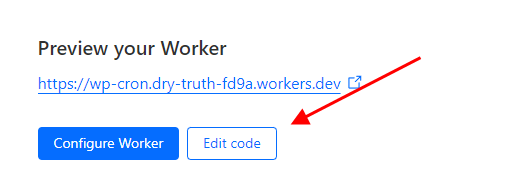
#3 Type in a name for your cron service (e.g. wp-cron-something) and press on “Deploy” button. Then press on “Edit code” button in the next screen.
#4 Now you should see a text editor where you can add the code of your CloudFlare worker (see the image below).
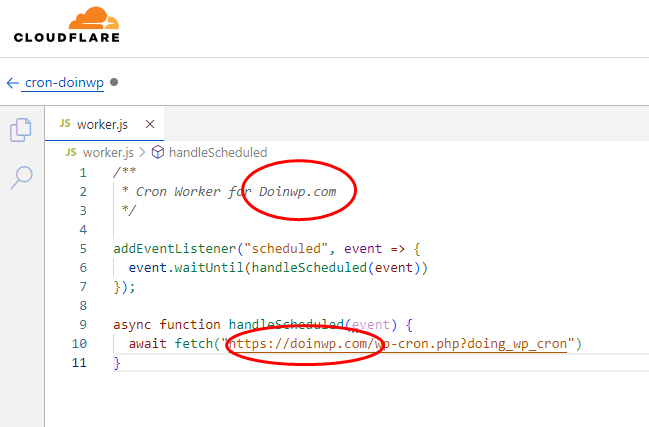
Copy / paste this code snippet in the editor screen. Modify it by changing the domain name to your website and press on the blue “Save and deploy” button:
/**
* Cron Worker for Doinwp.com
*/
addEventListener("scheduled", event => {
event.waitUntil(handleScheduled(event))
});
async function handleScheduled(event) {
await fetch("https://doinwp.com/wp-cron.php?doing_wp_cron")
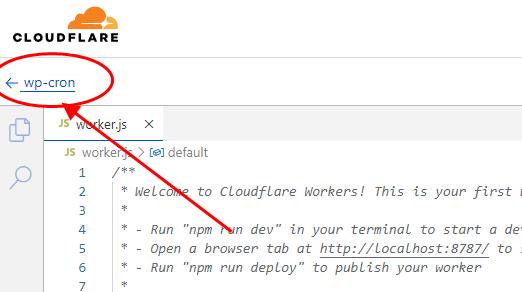
}#5 Next you need to go back to the dashboard of your CloudFlare worker (see the image), select the “Triggers” tab and scroll down to the “Cron Triggers” section. From there just press the “Add Cron Trigger” button.
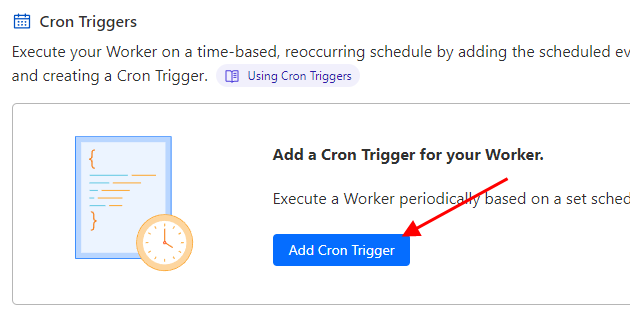
#6 Configure the cron schedule by setting an interval on how often do you want to run the cron service. You can use the “Basic” tab to set it, for example to run – every 5 minutes, or for more advanced schedule, you can use the “Cron” tab (see some cron schedule samples above in the “Add a server cron task for WordPress via Plesk” section of this article if needed).
Press on the “Add Trigger” button and that’s it! You’ve configured a CloudFlare worker service which will periodically execute the WordPress cron directly from CloudFlare.
How to check if WordPress Cron is working properly
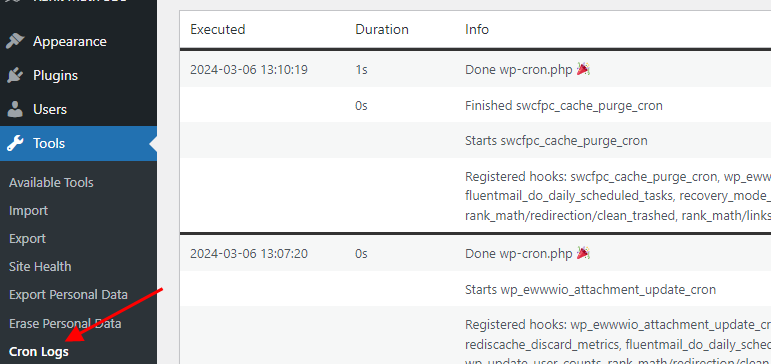
To check if WordPress Cron tasks are being executed in background, you can use the “Cron Logger” plugin by Edward Bock. After you install and activate it, visit “Tools” -> “Cron Logs” in the WordPress admin section to see how well your cron tasks are executing.
Do not forget to deactivate the plugin after testing how well the Cron works for you. You should leave it enabled only when you’re debugging something (just to not cause a useless load on the website).
Common problems with running Cron
Cron command fails to execute for no apparent reason
Check if you’re not affected by a Backspace does not work in SSH Terminal (chroot) problem. Simply try to log into the site via SSH terminal, type in some command and check if you can use the [BACKSPACE] key. If it acts as a [SPACE] key, try to solve the issue with these instructions.
wget: No route to host
When you execute a “wget” command without –inet4-only flag attached, sometimes it may cause a delay because of unsuccessful attempts connecting to an IPv6 addresses first. This of course depends on how your server is configured.
Connecting to mywebsite.tld (mywebsite.tld)|XXXX:XXXX:XXXX::XXXX:XXXX|:443… failed: No route to host.GnuTLS: The request is invalid.
When you make a HTTPS request via “wget” command in a chrooted environment, you can face an errors similar to the ones below. The trick is to use “–secure-protocol tlsv1 –no-check-certificate” flags at the end of your “wget” command as a quick workaround.
GnuTLS: The request is invalid.
Unable to establish SSL connection.
ERROR: The certificate of `mywebsite.tld' is not trusted.
ERROR: The certificate of `mywebsite.tld' hasn't got a known issuer.bash: php: command not found
This one you will get when trying to directly execute a php script via php executable which is not the correct way how to run WordPress cron because of known compatibility issues. Try the wget method described above. This error message just says that php command is not found and if you still want to run the php script directly, you should use a full path to php executable instead of just using the word “php”
wget: unable to resolve host address
This error is typical in a chrooted environment on Plesk (when you do not have the full access to the SSH). To fix this, you must login into the server via SSH with a root user and rebuild the chroot template which can be done with these three simple commands:
wget https://raw.githubusercontent.com/plesk/kb-scripts/master/update-chroot/update-chroot.sh
chmod +x update-chroot.sh
./update-chroot.sh --rebuild
Temporary failure in name resolution
Sometimes a simple rebuild of chroot template will not help and the most possible reason is messed up resolv.conf file in your chrooted environment. To fix this – first create a backup of the existing file and then manually place a new copy of resolv.conf file from the global chroot template. It can be done with the following two commands (just remember to run them as root user). Also note that in the code snippet you see a bolded text “domain.tld” – you should replace it with your webspace / domain name.
mv /var/www/vhosts/domain.tld/etc/resolv.conf /var/www/vhosts/domain.tld/resolv.conf.bak
cp -a /var/www/vhosts/chroot/etc/resolv.conf /var/www/vhosts/domain.tld/etc/
Common mistakes and misconceptions when dealing with WordPress Cron
Disabling the default Action Scheduler
Some resources on the Internet advise to turn off the default Action Scheduler so that it does not run via WordPress cron service and to use the server cron instead – to execute “action-scheduler run” command via WP-CLI. This is often advised for “better performance gains” and while it would seem tempting, once again it is a mistake.
Running any automated background tasks via WP-CLI is an unreliable approach. As said before – it could cause compatibility issues with some plugins which do not have a proper WP-CLI support, the tasks could fail eventually.
Relying on bots and crawlers to “spin up” the default WordPress Cron
At first this idea seems clever, but let’s take a look at these facts:
- Legit bots and crawlers do not have a “regular” schedule when to visit your site. It happens eventually and can often cause the previously mentioned “cold starts” for your website.
- While legit bots will visit your site at a certain frequency and respect your server resources, malicious bots do not care about it and they’ll often DDOS your website with tens or hundreds requests per second.
- Leaving your site exposed to malicious bots is a security risk from all aspects. You should block the malicious traffic at the firewall level and not let it “hit” the site. Content stealing, hacking and DDOS attempts versus a “regular cron schedule” is not a thing you should put up for discussion.
With all this in mind – it comes down to another bad approach which should be avoided.