
Properly configured PHP OPCache settings play a vital part in WordPress website performance therefore it is certainly worthwhile to pay good attention to these. Before we dive into what settings will be the best, it is important to understand what is PHP OPCache and how it works.
Table of Contents
What is PHP OPCache?
When you run a PHP file, it automatically converts into bytecode – a computer object code that further converts to a binary machine code so it can be understood by the server hardware processor. PHP OPCache is a mechanism that stores precompiled PHP scripts bytecode in the server memory (or on the file system), therefore saving the time necessary for reading and compiling them again and again and again.
A script which is not cached in the PHP Opcode Cache can take 3 times as much time to execute
Why PHP OPCache is important for WordPress?
WordPress architecture is built in such a way that for a website to load it needs to be put up together from hundreds, often even thousands of PHP files. You can check this yourself by temporarily pasting this code at the end of the main index.php file of your website and then by opening your site with a /?debug=1 parameter added at the end of its URL:
if(!empty($_GET['debug'])) {
    print_r(get_included_files());
}
Here is an example of one WordPress website doing 1905 file inclusions when a main page gets opened:

Just imagine what enormous work the server has to do by reading, compiling and then executing all these php files! However this is typical for most WordPress installations, especially when large plugins like Woocommerce or WPML are being used. That is exactly why the PHP OPCache needs to be properly configured – to take away the need of compiling all these PHP files each time the website gets opened.
How to spot performance problems affected by incorrect OPCache settings?
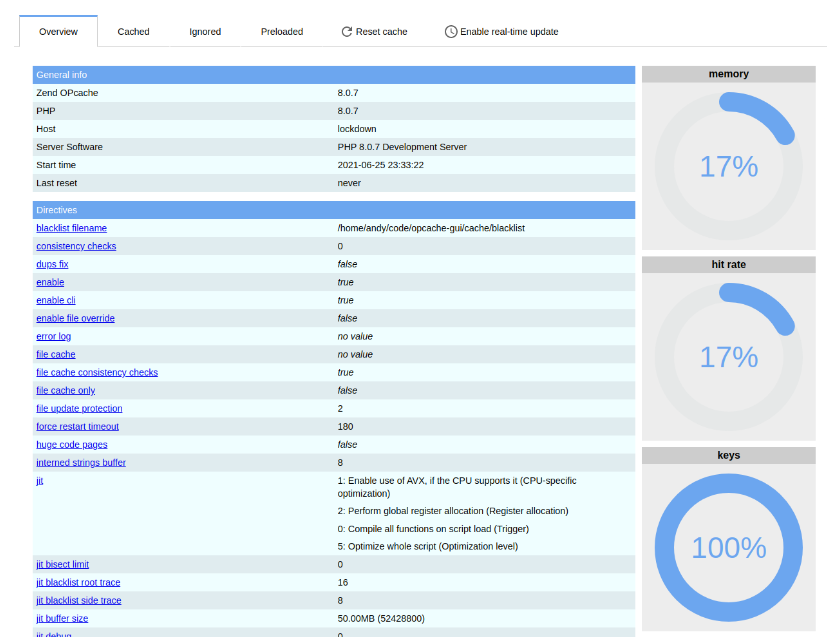
For this you will need a tool like opcache-gui. When extracted, it comes in a directory which you can place on your website and, when opened, it will show you the PHP OPCache usage stats, along with the option to check the OPCache usage in real time.
Normally the PHP OPCache is already enabled in PHP configuration and the scripts already are somewhat benefiting from it. Typical way how you can observe that something is not right with the OPCache settings is when you see a frequent unexplainable spikes in your page loading times.
If a page on your website usually opens in 200 milliseconds, but quite frequently you see that it opens at least 3x times longer (e.g. 16 requests are finished in 200ms each, but the 17th request finishes in 1.2 seconds), it could signal that something is not right with PHP OPCache settings
Most common configuration problems include:
- Insufficient amount of memory delegated for PHP OPCache
- OPCache has timestamp validation enabled, which frequently kicks the script out from the cache
- Accelerated files limit is set too low
- PHP OPCache is being shared between multiple websites
What problems you can indicate in the “opcache-gui” interface and how to do it:
When checking the donut charts on the right side, you will see there three indicators – “memory”, “hit rate” and “keys”. To observe how PHP OPCache is behaving you should also enable the real-time updates (the button with a clock icon). While observing the OPCache stats at the “opcache-gui” panel, you should browse a different parts of your website in parallel.
- MEMORY: If you see that memory is mostly full (nering 100% or resetting itself from time to time), that is a clear indicator you should raise the memory limit for PHP OPCache. If you see a low value there which stays persistent, it most probably indicates that with memory limit everything is ok.
- HIT RATE: Ideally you should see a constant 100% hitrate. If it is below 100% something is not right – either the opcache.validate_timestamps is turned on, the OPCache memory limit is too low or there is a too strict limit set in the opcache.max_accelerated_files variable.
- KEYS: You should expect here a maximum of 75%. If it is above that, you may face a performance problems with your PHP scripts at some point.
If you see unexplained drops in these donut charts which periodically come back to a normal level, something else may not be right – as an example, it could indicate that you’re using a shared OPCache because of a single PHP master process.
PHP OPCache for multiple websites on the same server
When we take in account that you need to host multiple websites on the same server with PHP-FPM enabled, it is important to understand that each PHP OPCache instance is tied to a master process in PHP.
Therefore more advanced PHP configuration may be needed to separate OPCache instances, avoid the security issues and the fact that resetting OPCache for one website will reset it also for others. While I will leave this for later, luckily there is a very easy way out of this problem, just by choosing the right hosting management system for your server.
PHP OPCache and PLESK
Running a separate PHP master process for each website is an ideal way to go and PLESK as a hosting management system provides exactly that – right out of the box! With its “Dedicated FPM” feature for PHP it directly solves every issue you may face when running PHP-FPM for multiple websites on the same server – PHP OPCache is isolated and performance of one website does not affect the other. This is also one of the main reasons why PLESK has been my top choice for hosting WordPress websites.
PHP OPCache, PHP-FPM and CPanel
This however is a “pain in the a**” topic. When using PHP-FPM on CPanel it by default shares the same PHP master process between multiple sites while assigning a different PHP-FPM pool for each site. This is exactly why the Internet is flooded with topics like “php-fpm high cpu usage on cpanel”, “php-fpm problems on cpanel”, “php-fpm crashing”.
The fact that PHP-FPM pools are not shared means nothing – when a website is using shared PHP master process in PHP-FPM mode, it also shares the PHP OPCache instance with other websites in the same master process and that causes:
- Potential security issues (one site can possibly access the other site’s cache)
- Clearing a PHP OPCache, resets it for multiple websites at once
PHP OPCache settings you should use for your WordPress website
These settings are meant for a single site production environment. You may have to adjust these variables differently when dealing with a shared PHP OPCache (when a PHP master process is shared between multiple websites in PHP-FPM mode).
So now when you understand what’s and why’s, it is time to dig into the details. These settings you can configure by editing the php.ini file of your PHP installation and adding / editing these variables under the [opcache] tag:
1. Enable PHP OPCache:
First things first. For PHP OPcache to work you must ensure that it is enabled. You will most probably already find this line in your PHP configuration, but check if it is commented out and uncomment it. By default many PHP installations already have the Zend OPCache enabled, so it is a high chance that you do not need to change anything here.
; Determines if Zend OPCache is enabled
opcache.enable=1
2. Enable PHP OPCache CLI
For WordPress it is safe to enable OPCache also for PHP Command line interface. This can be useful for scripts which are being run from the command line.
; Determines if Zend OPCache is enabled for the CLI version of PHP
opcache.enable_cli=1
3. Configure the shared memory storage size
By default PHP OPCache is configured to not consume more than 128 megabytes of the server memory. For WordPress sites however this is not sufficient and could cause OPCache to reset from time to time, resulting in page loading time (TTFB) spikes. You should raise this limit to 384 megabytes at least.
; The OPcache shared memory storage size.
opcache.memory_consumption=384
4. Configure the interned strings buffer
The Interned Strings buffer is used to store identical (interned) strings in the server memory – strings which are detected in the PHP code. This buffer is a nice tweak to have for faster PHP code execution, since it saves up the time for PHP processor on parsing repetitive junk. The default setting is 8 megabytes which is far too less for WordPress sites. Although I’ve not seen a WordPress site which could “eat” more than 32mb of interned strings buffer, still I’d like to recommend you to raise this value to at least 64 megabytes. Just to be safe.
; The amount of memory for interned strings in Mbytes.
opcache.interned_strings_buffer=64
5. Set the maximum number of files for PHP OPCache to accelerate
opcache.max_accelerated_files defines the maximum amount of PHP files that can be stored in OPCache. Typical WordPress installation should not reach a 5k barrier for the amount of cached files in PHP OPCache, therefore I’d recommend to set this value to at least 5000 or leave the default setting of 10000.
; The maximum number of keys (scripts) in the OPcache hash table.
; Only numbers between 200 and 1000000 are allowed.
opcache.max_accelerated_files=10000
6. Leave the “Max wasted percentage” to default since we’ll be not wasting anything
Since we’ll not let the OPCache to automatically update its cache we will not need this variable to be adjusted. It can safely stay at the default value of 5%. opcache.max_wasted_percentage defines the maximum allowed amount of memory which can be wasted for inactive scripts before OPcache attempts to restart itself.
; The maximum percentage of “wasted” memory until a restart is scheduled.
opcache.max_wasted_percentage=5
7. Always ensure that OPcache appends the current working directory to the script key
A script key in PHP OPCache identifies a cached PHP file. opcache.use_cwd variable defines what the script key should contain – only a filename or a full path to the file (current working directory + filename). By default this variable is enabled and it should stay that way in almost every case, especially if we’re talking about hosting WordPress installations.
; When this directive is enabled, the OPcache appends the current working
; directory to the script key, thus eliminating possible collisions between
; files with the same name (basename). Disabling the directive improves
; performance, but may break existing applications.
opcache.use_cwd=1
8. Disable the validation of timestamps to further improve performance on a live website
When opcache.validate_timestamps is enabled, it will check the timestamps of PHP files to determine if they have been updated and cache-bust the outdated ones. Technically on a live website (production environment) there should be no frequent changes in the PHP files (unless you’re doing a live debugging in which case you can just temporarily disable the OPCache), therefore there’s no natural need for PHP to check and “refresh” the outdated files in its OPCache periodically. You should reset the OPCache only after a new changes of code have been deployed to your live website. Change the “opcache.validate_timestamps” variable to 0 to disable these unnecessary checks.
Note that by doing this you will have to restart the PHP instance or reset the PHP OPCache each time when you’ll make changes in your website code.
; When disabled, you must reset the OPcache manually or restart the
; webserver for changes to the filesystem to take effect.
opcache.validate_timestamps=0
9. Enable the fast shudown for the OPCache (deprecated)
Adjusting this variable is only necessary if you use a PHP version older than 7.2.0. For newer PHP versions you can skip this part as a variant of the fast shutdown sequence has already been integrated in them.
; If enabled, a fast shutdown sequence is used for the accelerated code
; Depending on the used Memory Manager this may cause some incompatibilities.
opcache.fast_shutdown=1
10. Leave the saving of PHP comments enabled
Disabling the opcache.save_comments variable instructs PHP OPcache to remove any PHPDoc comments from the PHP code when compiling it. While it could seem tempting to get rid of these comments at the first glance, unfortunately WordPress uses a lot of them to initialize plugins, page templates, etc, therefore such move would result in a little disaster. Leave this enabled.
; If disabled, all PHPDoc comments are dropped from the code to reduce the
; size of the optimized code.
opcache.save_comments=1
11. Enable the PHP code copying into huge pages
Technically Huge code pages reduces the size of the index that has to be searched to find allocated memory by allowing larger chunks of memory to be claimed instead of smaller blocks. Before you enable this feature, you must ensure that the huge code pages are actually supported by your server operating system. PHP OPCache supports only EXPLICIT huge code pages so be careful to not mix this with Transparent Huge Pages which is a completely different topic.
; Enables or disables copying of PHP code (text segment) into HUGE PAGES.
; This should improve performance, but requires appropriate OS configuration.
opcache.huge_code_pages=1
To check if your OS supports the huge pages and have them enabled / configured, use this command via SSH:
sysctl -a | grep vm.nr_hugepages
If you see that “vm.nr_hugepages” variable is set to 0, then most probably the huge pages have been disabled on your server and you will not gain any benefit from having this OPCache feature enabled. You can read more about how to configure the huge code pages on the GetPageSpeed blog.
Other WordPress PHP OPCache related settings
When you run a live WordPress website, you, as a developer should ensure that no PHP files are being changed in it without your consent (no auto-updates and no dynamic generation of PHP files). This is critical for both – security measures and stability.
When you turn off the “validation of timestamps” in PHP OPCache and moreover, when you enable JIT compilation (mentioned further), it is expected that PHP files on the server stay the same until next deployment, which should be done manually, plus after each code deployment you should clear the PHP OPCache.
If the OPCache is not cleared after the changes in PHP files, your site might go down and become unreachable up until the moment when you clear the OPCache.
To disable automatic updates and file modifications on your WordPress website, ensure that your WordPress configuration file (wp-config.php) contains these directives:
define('DISALLOW_FILE_MODS', true);
define('DISALLOW_FILE_EDIT', true);
define( 'WP_AUTO_UPDATE_CORE', false);
Ideally you should deploy a code changes to your website via some version control mechanism (e.g. GIT) and automate the deployment so that when its done, it also clears the PHP OPCache along with other caches you may use (page cache, object cache, etc.).
PHP OPCache: WordPress and JIT compilation
While you can find articles online which advises to enable JIT support for the PHP OPCache for increased performance benefits, I would be very careful with this when dealing with WordPress. In a recent past I’ve constantly faced problems while running WordPress with JIT enabled.
When you enable the JIT (Just-in-time compilation) it may seem that your website works smoothly at first, but after a while you may face the issues with executing some scripts or even get a complete white screen of death for the whole site.
I’ve not tested this bug on the latest versions of PHP, but somewhere in the autumn of 2023 it was still present.
If you are confident to try the JIT on your WordPress website, it can be done by adding these two extra configuration variables in your PHP configuration file:
opcache.jit_buffer_size=100M
opcache.jit=1235
JIT is not working, yes! I tested it in July/August 2025 but after some days (or on big sites some hours) the page isnt loading anymore. If I restarted the apache its working for a short time…