
This guide will help you to install and fully configure Elasticsearch 7.1.0 on your AlmaLinux based server, specifically for the use in WordPress based websites. It does not matter what hosting management system you run (suitable for all, including CPanel, Plesk and VirtualMin), since this tutorial will instruct you how to install it on a server level.
The main goal of this tutorial is to give you an introductory course on how to install and configure a self-hosted ElasticSearch cluster just enough (technically speaking: single cluster, single node environment) so you can use it as a “search engine” replacement for your WordPress based website and get all of the core features it provides.
Note that this guide is for installing Elasticsearch 7.x specifically. For other Elasticsearch versions the installation procedure may slightly differ.
This tutorial is for VPS, VDS or Dedicated server users only. If you use a shared or cloud hosting, contact your hosting provider to see if an Elasticsearch service is available for you, or use a different tutorial which is more suitable for your needs.
Table of Contents
What is Elasticsearch?
Elasticsearch is a modern search and analytics engine (a search server) based on the Apache Lucene library. It is often selected by web developers as a much better alternative than a simple “script based” search (e.g. the one you see by default on every WordPress website), because of the four main reasons:
- Elasticsearch is an independent search engine service which offers much better performance and accuracy than a script based search engines;
- It returns closest matching results even if a search query contains typos;
- It supports advanced configuration like synonyms (e.g. you search for shoes, it’ll include sneakers in the search results) and content prioritization;
- It offers scalability and resilience with its “clusters, nodes and shards” architecture;
So… what about these clusters, nodes and shards, huh?
If you’re interested in using ElasticSearch, you’ve probably run into these terms which can often be confusing for first timers. To better understand the architecture how ElasticSearch is built and how it works, I recommend you to fully watch this video, which explains the whole thing in more simple terms:
Bottom Line: For most folks it will be just fine with using a “single cluster / single node” model on the same machine where your website is being hosted, without going into all this complicated stuff. Unless we’re talking BIG (gigabytes of data, hundreds or thousands of queries per second), you can safely proceed with the installation, and forget about scaling for now. In any case – setting up your first ElasticSearch instance is the very first step in the whole journey. 🙂 So, right to the instructions then!….
#1 System Requirements to run Elasticsearch server
Here are the recommended system requirements for running an Elasticsearch server (single cluster / single node). Anything lower could cause some problems with stability or performance because Elasticsearch is a resource demanding service:
| CPU | at least 4 Cores |
| RAM | minimum of 8 GB |
| DISK SPACE | 50 GB of free space, preferably on an SSD drive |
#2 Log into the terminal / SSH and install latest version of Java
Elasticsearch is written in Java, so the first thing you need is to install latest Java Runtime Environment (JRE) package on your server. Login as root into the SSH terminal of your server and run this command to automatically download and install OpenJDK on your server:
yum install java -yVerify the installation afterwards with this command:
java -versionYou should get an output like this:

#3 Download and add elastic.co public signing key to your server
rpm --import https://artifacts.elastic.co/GPG-KEY-elasticsearch#4 Add Elasticsearch repository
Use your preferred text editor to create the file elasticsearch.repo in the /etc/yum.repos.d/ directory. I prefer to do this via the SFTP client, but you can also use vi to create the file. Run this command and right after running press “i” key to activate the insert mode:
vi /etc/yum.repos.d/elasticsearch.repoThen copy/paste lines into the file and press the ESC key to exit the insert mode:
[elasticsearch]
name=Elasticsearch repository for 7.x packages
baseurl=https://artifacts.elastic.co/packages/7.x/yum
gpgcheck=1
gpgkey=https://artifacts.elastic.co/GPG-KEY-elasticsearch
enabled=1
autorefresh=1
type=rpm-md
Type in :wq and press ENTER key to save the file.
#5 Installing Elasticsearch
Now, when all preconditions are met, run this command to install the Elasticsearch:
yum install elasticsearch-7.1.0 -y#6 Stop Elasticsearch from updating automatically
When you install a specific version of Elasticsearch and want to stay with it, you must prevent it also from updating. This can be done by editing /etc/yum.conf file and adding an exclusion there. Add the following line to it or just append elastic* to the “exclude” variable if its already there:
exclude=elastic*Different method for Plesk users
If you use Plesk as a hosting management system for your server, you should use a different approach. Do not make changes to yum.conf file, but instead log into Plesk with administrator / root user account and:
- Navigate to “Tools & Settings” page
- Look up the “Server Management” section and navigate to “System Updates” page
- Select “All Packages” tab and by using search – lookup “elasticsearch” package

4. Mark the checkbox and press on the “Lock” button or just toggle the lock icon to prevent ElasticSearch from updating.
**This is a necessary step if you want to use Elasticsearch with ElasticPress plugin for WordPress.
#7 Isolating the Elasticsearch
By default ElasticSearch is NOT open to the outside world (accessible only from localhost) and presuming that you’ll use a single node setup on the same server where your website is being hosted, you should leave it like that.
Alternatively, if you plan to:
- host ElasticSearch on a different machine than your website
- remotely access the ElasticSearch cluster for management purposes
- configure the ElasticSearch cluster to work with multiple nodes (on multiple machines)
you can change the network.host setting to “listen to all interfaces”, therefore exposing the ElasticSearch instance to the Internet. To do so, first open the file /etc/elasticsearch/elasticsearch.yml.
To edit the file via “vi” editor, use this command and then press “i” key to activate the insert mode:
vi /etc/elasticsearch/elasticsearch.ymlAfter that, navigate to the “network.host” line, uncomment it, change its value from localhost to 0.0.0.0, then press ESC key to exit the insert mode.
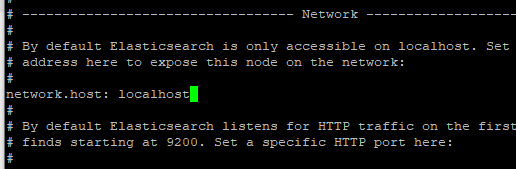
As usual type in :wq and press ENTER key to exit the vi editor.
Be aware that by exposing ElasticSearch instance to an outside world, you must ensure that it is properly secured. Depending on your configuration, the very least thing you should do is to protect it with a username and password (covered further on this article). Consider also adding extra rules in your server firewall, let’s say to allow access only from specific IPs, if this is your case.
#8 Enable Elasticsearch as a service and start it up!
This step is as simple – you just need to run these 4 commands in the following order:
/bin/systemctl daemon-reload
/bin/systemctl enable elasticsearch.service
/bin/systemctl start elasticsearch.service
/bin/systemctl status elasticsearch.service
#9 Verify if the Elasticsearch service is working
Simply run this command to see if everything went well with the installation:
/usr/share/elasticsearch/bin/elasticsearch --versionYou should see an output like this:

#10 Add additional configuration for Elasticsearch
Now that the basic setup and configuration of the Elasticsearch is done, there is a bit of additional configuration needed. This time we will enable security so you can setup a proper authentication for your Elasticsearch server and set the discover type as “Single node”, since you probably do want to start with the basics. Again open the /etc/elasticsearch/elasticsearch.yml file and proceed with adding the lines you’ll see below.
To edit the file via “vi” editor, use this command and then press “i” key to activate the insert mode:
vi /etc/elasticsearch/elasticsearch.ymlYou can add these lines safely at the end of the file.
discovery.type: single-node
xpack.security.enabled: true
After that press the ESC key, type in :wq and press ENTER key to exit the vi editor. Enter the next command to restart Elasticsearch service with the new configuration:
/bin/systemctl restart elasticsearch.service#11 Setup the passwords for default Elasticsearch users
Before you can start using Elasticsearch, you must set passwords for all of the default Elasticsearch users – elastic, apm_system, kibana, logstash_system, beats_system, remote_monitoring_user. Do this by running the following command:
/usr/share/elasticsearch/bin/elasticsearch-setup-passwords auto -u "http://localhost:9200"And note down the autogenerated passwords it gives you. You will need this information later when you’ll configure your Elasticsearch application.
#12 Final check: Elasticsearch Installation complete!
Now it is time to check if you can log into the Elasticsearch service. To do this, simply type this command into the console and replace the word “YOURPASSWORD” with the one you noted down earlier (for user: elastic):
curl -u "elastic:YOURPASSWORD" http://localhost:9200 -kRun the command and you should get an output like this:
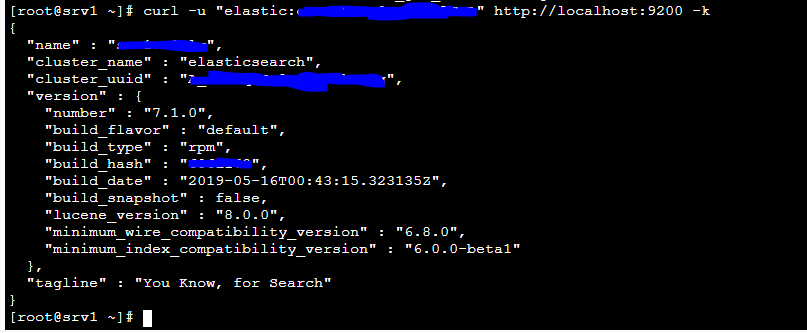
Hoorray! You’ve installed Elasticsearch on your server! 🙂
Note that I’m using “http” version of Elasticsearch urls in my tutorial. That’s because if you do not make Elasticsearch publicly available and use it locally on the same server, there is no need for encrypted communication.
How to uninstall Elasticsearch?
In case you changed your mind or just want to install a different version of Elasticsearch, you just need to run 3 commands to completely uninstall it from your system:
yum remove elasticsearch -yNow when you have elasticsearch removed, you need to cleanup remaining files from your system, otherwise they can cause a problems on the next installation:
rm -rf /etc/elasticsearch/rm -rf /var/lib/elasticsearch/Use Kibana for managing ElasticSearch
You should know that ElasticSearch does not have any visual interface by itself, therefore ways of managing an ElasticSearch instance are pretty limited.
One of the most important and practical questions you may ask is about the user management. For example – if you need to use the same ElasticSearch instance on two websites at once, but you want to isolate one’s data from the other – is it possible?
Yes, to this and lots of other ES management related questions! You just need to install and configure Kibana – a tool which is basically a graphical user interface for ElasticSearch and offers wide variety of options, including the ones for managing users and user roles, monitoring of clusters, nodes and indexes, viewing stats, configuring different settings, etc…
While it is not that hard to get Kibana up and running, I will leave this topic for another day. Stay tuned!
Frequently Asked Questions
Can I host multiple ElasticSearch nodes on the same server?
It is possible, but you should avoid this approach. Technically there is a little to no advantage in doing so. It will still be a “Single Point of Failure” system and besides you could face some performance issues because all of these nodes will use the same physical resources.
Do I need a separate server to run ElasticSearch?
No, it is certainly not a requirement. You can run it from the same server where your website is hosted, as long as the server meets the minimum necessary requirements for running ES – it is a common practice to do so and scaling up is only needed when you start facing performance problems with your setup.