In this article I will sum up some mandatory things, which you generally should do if you are a hosting a website, that is routed via CloudFlare and hosted on a Plesk server, if you want your site to be secure. This will be more suitable for VPS, VDS or dedicated server owners.
Table of Contents
Ensure that your server IP address does not leak
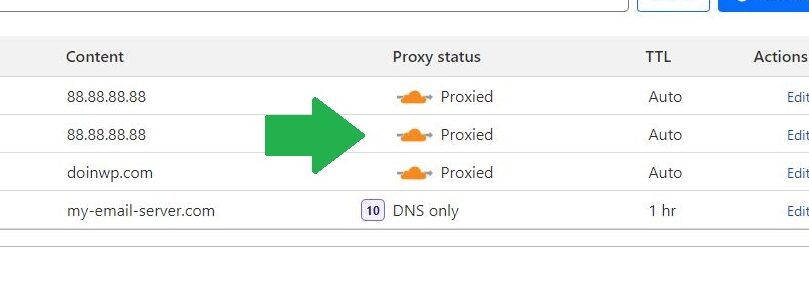
Generally if you are using CloudFlare, unless you have a good reason to use it only as a DNS service, it is a must have to proxy all A / AAAA records through CloudFlare. Not to mention all the CDN stuff and caching you get with it, but mainly for security reasons – so the bad guys does not see your server IP address and can’t conduct direct attacks to the server or to your website.

Sidenote about Web Hosting and E-mail services:
Along with this it is also a bad practice to use the same server IP for a mail server. In general if you plan to host a websites and an e-mail service, you should use different servers for each purpose, so one does not leak or impact the other. Also when using a self-hosted mail server for multiple of your websites, try to get a dedicated IP for each of the domains + create an MX records in such way so that they do not tie to one particular domain because all of that can be backtraced. Or the safest and simplest way for the e-mail hosting – just choose some paid e-mail provider like Gmail or Outlook and forget about everything, but hosting your websites.
The scariest thing about IP leaks is that even for an once. Even for a short period of time, if your server IP address leaks, there are services around the internet (like Security Trails) which monitors this stuff and saves the history of it. Not only the server security is important, but a single IP leak of the server could give away hackers the list of all websites you are hosting on that particular server, which could be bad for your business or give away some of your privacy.
A few practical examples why you should keep your server IP hidden:
Bad for Privacy: You host a couple of adult themed websites along with your personal blog – would you want to link your name to these sites and yell to all internet “Hey! Hey! I host them! I am the owner!”?
Bad for Business: You run a “web hosting” business on the same server you host your website and the competitor wants to offer all your clients a service for cheaper price. Would you want him to get this list of your clients?
Do not allow direct HTTP/HTTPS traffic to your server
When proxying all of your websites through CloudFlare, this is the next thing to do, to keep up a good security measures. As with this approach your server should expect the WWW traffic only from the CloudFlare network, there is no need to accept the HTTP / HTTPS connections from other hosts.
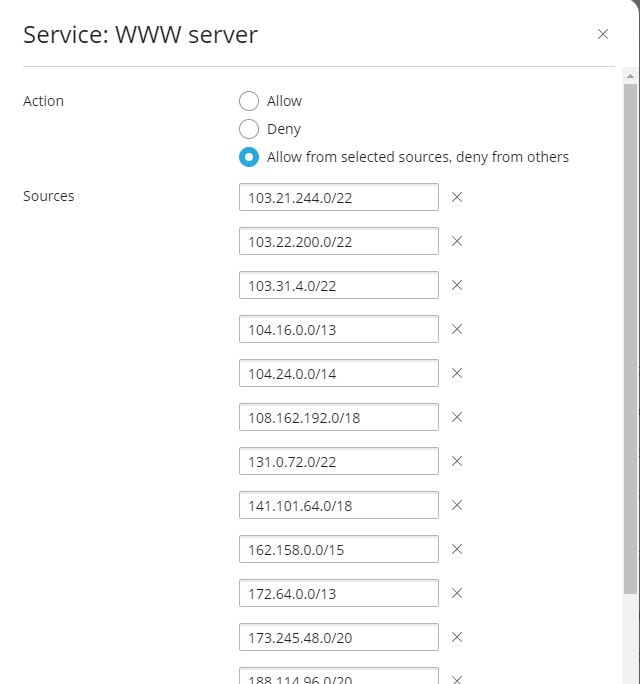
So first thing you need is a list of CloudFlare network IPs: https://www.cloudflare.com/ips/
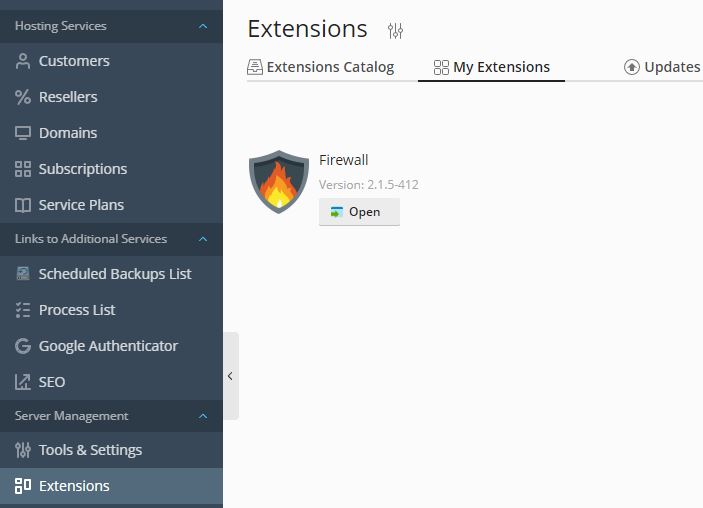
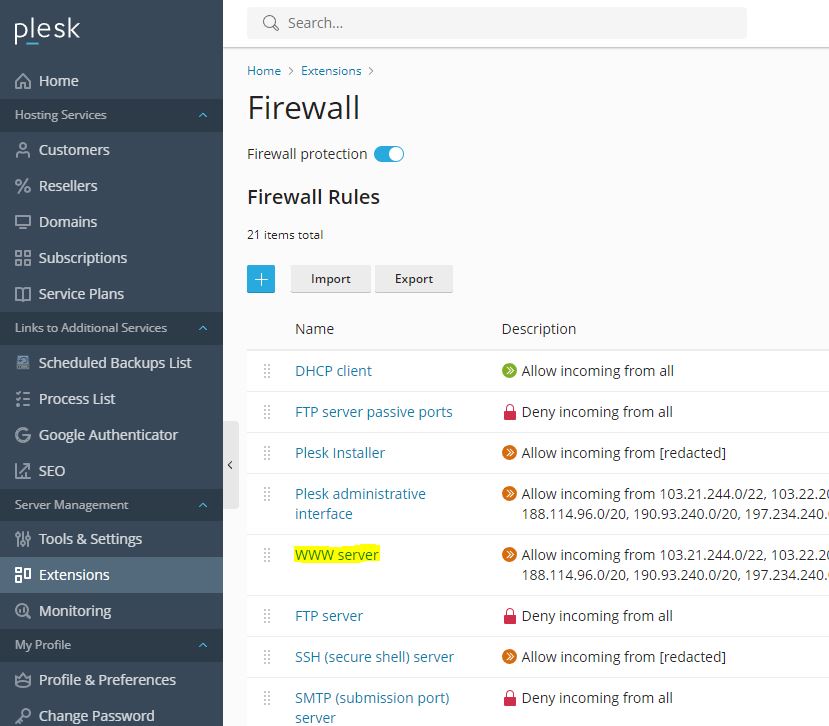
Next, follow with adding them to your server firewall. Assuming that you’re using the standard Plesk Firewall, you should proceed with opening it via “Extensions” -> “My Extensions” -> “Firewall“.

And adding all of the CloudFlare IP subnets to the “WWW server section” (images below).
Warning: If ANY of your websites that are on the Plesk server you’re configuring are not proxied via CloudFlare and you are proceeding with this, they will become inaccessible – proceed with caution!


Deny access to other unused services
Technically, if we are speaking about Web Hosting only (without mail hosting or additional stuff), to reduce the stress on your server from bots or malicious attackers, you should also add “Deny incoming from all” rule in the Firewall to all these additional positions:
- FTP server passive ports (nobody uses regular FTP protocols these days. everything should happen via SSH/SFTP, and if you use FTP, you should go to with SFTP too)
- FTP server (nobody uses regular FTP protocols these days. everything should happen via SSH/SFTP, and if you use FTP, you should go to with SFTP too)
- SMTP (submission port) server
- SMTP (mail sending) server
- POP3 (mail retrieval) server
- IMAP (mail retrieval) server
- Mail password change service
- MySQL server (leave it enabled only if you manage your MySQL databases remotely)
- PostgreSQL server (leave it enabled only if you manage your PostgreSQL databases remotely)
- Samba (file sharing in Windows networks)
- Domain name server (if you use CloudFlare for your DNS, this is not necessary)
- Ping service
- System policy for incoming traffic (configure additional rules if other than default incoming traffic is neccessary)
- System policy for traffic forwarding
Setup CloudFlare SSL with Plesk

To secure a connection between the CloudFlare and your web-server, you should enforce the SSL/TLS mode to Full (Strict) and add a CloudFlare Origin certificate to your website. This can be done in a following way:
#1 Go to your CloudFlare account and select the domain you want to configure;
#2 Select a “SSL / TLS” -> “Origin Server” section from the side menu and press on the “Create certificate” button;

#3 Leave the default settings and press on the button “Create“. On the next screen you should get the Origin Certificate and a Private Key in a separate text fields. Copy/paste these two in a text document and save it for later; Save also the CloudFlare Origin CA certificate (RSA PEM) by downloading it from this link;

#4 Log into Plesk, select your domain profile via “Websites & Domains” and open “SSL/TLS Certificates” section. Then click on “Add SSL/TLS Certificate” button

#5 Type in the name of your SSL certificate (I use “Cloudflare ORIGIN” as a certificate name but it could be really anything) and choose your country

#6 Then copy your SSL certificate, private key and the CloudFlare Origin CA certificate from the text documents you saved earlier to the corresponding fields and press “Upload Certificate” (you can open a .pem file just as regular text file – with any text editor to copy its contents)

#7 When you’ve uploaded the SSL certificate, return to your domain profile in Plesk and select the “Hosting” option (under “Hosting & DNS” tab)

#8 Select your SSL certificate under the “SSL/TLS support” section and click on “Save“

#9 Last step: Go back to your domain profile in CloudFlare, select a “SSL/TLS” -> “Overview” section from the side menu and set the SSL/TLS encryption mode as Full (strict). The setting should update automatically

Now you should have a proper end-to-end SSL encryption with CloudFlare
Completely deny incoming connections on port 80
If you manage all the sites on your server via CloudFlare (with the proxy mode being on for each site) there is practically no point of accepting non-encrypted connections, so you can also deny any incoming connections on port 80 which will serve as additional security measure. Once again – just ensure that all of the sites on your server meet the following criteria:
- They’ve been setup with CloudFlare and you’ve turned its “proxy mode” to on for all of the sites
- For each of the sites in the CloudFlare “SSL/TLS” section you’ve set “SSL/TLS encryption” mode to “Full” or “Full (strict)“
To proceed with blocking connections on the port 80, you should add the following rule to Plesk firewall:
Rule name: Deny HTTP (non-encrypted) traffic
Match direction: Incoming
Action: Deny
Ports: 80

Remove X-Powered-By from the response headers
When you host your websites with Plesk (Linux), it by default adds “X-Powered-By” response headers to each HTTP request which are useful for nobody but hackers to gain information about your server. You should remove these, by following instructions on this article.
Frequently asked questions
Why do I get Invalid SSL certificate error on CloudFlare?
This most probably happens because you’ve set the SSL/TLS encryption mode to Full (strict) on the CloudFlare SSL/TLS settings page, but you do not have a valid CloudFlare origin certificate installed for your domain on the server where the website is hosted.
Why do I get err_too_many_redirects error on WordPress with CloudFlare enabled?
This can happen if a SSL/TLS encryption mode has been set to Flexible in your CloudFlare SSL/TLS settings and you’ve installed WordPress for a domain with a “https” protocol in front of it. To solve this issue, change the encryption mode to “Full” at least.